Publish: 2019-06-04 Tags: cep 前端
Adobe-CEP 插件开发

# Adobe-CEP 插件开发
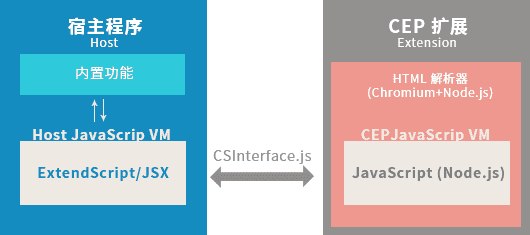
CEP (公共扩展平台),为 adobe 云应用创建扩展插件,能运用于Photoshop, Illustrator, InDesign, After Effects等等。
一个 CEP 插件实际上是一个在显示在宿主程序面板窗口中的网页,通过 CEP 提供的接口与宿主程序进行交互。这里要分清 CEP 扩展与宿主应用的关系。所谓宿主,就是载入 CEP 扩展的应用,例如一个运行在 PhotoShop 中的 CEP 扩展,它的宿主程序就是 PhotoShop ,作为宿主程序的 PhotoShop 有很多内置功能,和一个被称为 ExtendScript 的脚本引擎,通过 ExtendScript 脚本引擎能够调用各种 PhotoShop 的内置功能,比如创建一个图层、设置背景颜色等等。要注意的是 CEP 和 ExtendScript 都使用 JavaScript 但是它们分别运行在两个虚拟机中,并不在一个上下文中,所以互相是独立的。 另外,一个 CEP 扩展可以同时被多个宿主运行。
Adobe-CEP扩展插件需具备的知识技能点:
- CEP 依赖库 (opens new window)
- ExtendScript for Photoshop (opens new window) 语法 API
- 前端知识HTML,CSS,JavaScript,Nodejs
# 开发插件
# 目录结构
首先一个插件的基本目录结构包括以下文件:

/CSXS主要在该目录下建一个mainifest.xml的配置文件/client主要包含前端界面资源,包括 AdobeCSInterface.js等第三方库/host主要包含ExtendScript后台运行文件
# manifest.xml 项目配置
- ExtensionBundleId: 扩展插件运行 ID
- Extension Id: 扩展 ID,大部分声明面板归属
- Host Name & Version: 支持
Adobe应用程序的版本 [对照列表]([https://github.com/Adobe-CEP/CEP-Resources/blob/master/CEP_8.x/Documentation/CEP%208.0%20HTML%20Extension%20Cookbook.md#applications-integrated-with-cep](https://github.com/Adobe-CEP/CEP-Resources/blob/master/CEP_8.x/Documentation/CEP 8.0 HTML Extension Cookbook.md#applications-integrated-with-cep)) - MainPath: 前端页面入口文件
- ScriptPath: 后台文件运行文件入口
- Menu: 定义扩展的下拉菜单
- Size: 配置扩展的窗口大小
大致的配置如下:
<?xml version="1.0" encoding="UTF-8" standalone="no"?>
<ExtensionManifest xmlns:xsi="http://www.w3.org/2001/XMLSchema-instance" ExtensionBundleId="ai.kuaizi.www" ExtensionBundleVersion="1.0" Version="6.0"> <!-- MAJOR-VERSION-UPDATE-MARKER -->
    <ExtensionList>
        <Extension Id="ai.kuaizi.www" Version="0.1.0"/> <!-- 设置扩展 ID-->
    </ExtensionList>

    <ExecutionEnvironment>
        <HostList>
            <!-- 从 CC 2015 以上版本 -->
            <Host Name="PHSP" Version="[16.0,99.9]"/>
            <Host Name="PHXS" Version="[16.0,99.9]"/>
        </HostList>

        <LocaleList>
            <Locale Code="All"/>
        </LocaleList>

        <RequiredRuntimeList>
            <RequiredRuntime Name="CSXS" Version="6.0"/>
        </RequiredRuntimeList>
    </ExecutionEnvironment>
    <DispatchInfoList>
        <Extension Id="ai.kuaizi.www.cep"> <!-- 为 new_panel 设置属性-->
            <DispatchInfo>
                <Resources>
                    <MainPath>./index.html</MainPath> <!-- 指定起始载入的网页-->
                    <ScriptPath>./jsx/main.jsx</ScriptPath>
                    <CEFCommandLine>
                      <Parameter>--allow-file-access-from-files</Parameter>
                      <Parameter>--allow-file-access</Parameter>
                      <Parameter>--enable-nodejs</Parameter>
                      <Parameter>--mixed-context</Parameter>
                    </CEFCommandLine>
                </Resources>

                <Lifecycle>
                    <AutoVisible>true</AutoVisible> <!-- 设置扩展面板为可视-->
                    <StartOn>
                    </StartOn>
                </Lifecycle>
                <UI>
                    <Type>Panel</Type> <!-- 设置扩展显示为面板模式-->
                    <Menu>筷子云制作</Menu> <!-- 设置扩展标题-->
                    <Geometry>
                        <Size>  <!-- 设置扩展面板尺寸-->
                            <Height>400</Height>
                            <Width>250</Width>
                        </Size>
                    </Geometry>
                    <Icons>  <!-- 设置扩展面板图标-->
                        <Icon Type="Normal">./img/ps_logo_light.png</Icon>
                        <Icon Type="DarkNormal">./img/ps_logo.png</Icon>
                    </Icons>
                </UI>
            </DispatchInfo>
        </Extension>
    </DispatchInfoList>
    <Author>tomieric</Author> <!-- 作者信息-->
    <Abstract>tomieric, kuaizi.ai</Abstract> <!-- 扩展描述-->
</ExtensionManifest>
# 开发前端界面
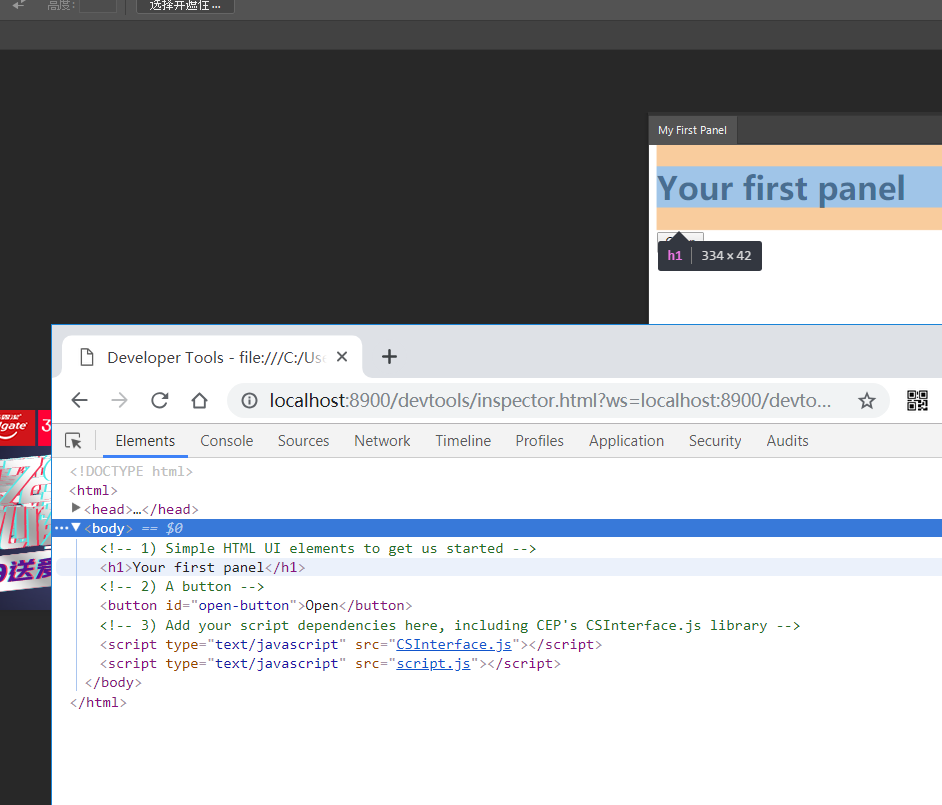
在 /client 目录新建前端界面的 HTML文件,并引入 CSInterface.js 库文件。如:
<!DOCTYPE html>
<html>
<head>
    <meta charset="utf-8">
    <title>Your First Panel</title>
</head>
<body>
    <!-- 1) Simple HTML UI elements to get us started -->
    <h1>Your first panel</h1>

    <!-- 2) A button -->
    <button id="open-button">Open</button>

    <!-- 3) Add your script dependencies here, including CEP's CSInterface.js library -->
    <script type="text/javascript" src="CSInterface.js"></script>
    <script type="text/javascript" src="index.js"></script>
</body>
</html>
# 编写插件与主程序交互 JavaScript 代码
引入 CSInterface.js 库后我们将可以使用它提供的 API 函数进行程序之间的相互调用。
/* 实例化 CSInterface */
var csInterface = new CSInterface();

/* 获取到按钮 dom 对象并进行事件监听 */
var openButton = document.querySelector("#open-button");
openButton.addEventListener("click", openDoc);

/* 执行函数与 后台 ExtendScript 脚本进行通信 */
function openDoc() {
  // 调用后台函数openDocument
  csInterface.evalScript("openDocument()");
}
# 后台ExtendScript 脚本
后台脚本与前端界面的脚本稍微不一样,它是基于程序宿主提供的语法函数,比如打开文件,编辑以及导出,甚至可以执行所有程序可运行的操作。
比如调用开发一张图片:
// 声明 openDocument 函数
// 在前端页面可以使用JavaScript 调用csInterface.evalScript("openDocument()")
function openDocument(){
  var fileRef = new File("~/Downloads/myFile.jpg");
  // app 对象是由 ExtendScript 环境提供的全局变量
  var docRef = app.open(fileRef);
}
# 首次运行您的插件
当编写好代码,我们就可以从应用app(Photoshop)中打开
窗口 > 扩展 > 筷子云制作
# 关于支持Node版本
后台ExtendScript 脚本基于 chromium 内核环境,不同的 app 版本支持不同 Node 版本。详细查看 [chromium-embedded-framework-cef](https://github.com/Adobe-CEP/CEP-Resources/blob/master/CEP_8.x/Documentation/CEP 8.0 HTML Extension Cookbook.md#chromium-embedded-framework-cef),支持的[API]([https://github.com/Adobe-CEP/CEP-Resources/blob/master/CEP_8.x/Documentation/CEP%208.0%20HTML%20Extension%20Cookbook.md#chromium](https://github.com/Adobe-CEP/CEP-Resources/blob/master/CEP_8.x/Documentation/CEP 8.0 HTML Extension Cookbook.md#chromium))
# Debug 调试
- Adobe ExtendScript Tool Kit 工具
- chrome 开发者工具远程调试
- 插件签名等等
# 关于未签名插件的调试
在Windows下修改注册表 HKEY_CURRENT_USER/Software/Adobe/CSXS.8 的 PlayerDebugMode 字段设为 1,在Mac下直接在终端工具上输入 defaults write com.adobe.CSXS.8 PlayerDebugMode 1
# windows
> REG ADD HKCU\\Software\\Adobe\\CSXS.8 /f /v PlayerDebugMode /t REG_SZ /d 1
> REG ADD HKCU\\Software\\Adobe\\CSXS.8 /f /v LogLevel /t REG_SZ /d 6

# Mac
> defaults write com.adobe.CSXS.8 PlayerDebugMode 1
> defaults write com.adobe.CSXS.8 LogLevel 6
# 远程调试
在插件的目录新建 .debug 文件即可开启远程调试 (Remote Debugging),编辑 .debug
<?xml version="1.0" encoding="UTF-8"?>
<ExtensionList>
    <Extension Id="com.adobe.CEPHTMLTEST.Panel1">
        <HostList>
            <Host Name="PHXS" Port="8900"/>
            <Host Name="IDSN" Port="8901"/>
        </HostList>
    </Extension>
    <Extension Id="com.adobe.CEPHTMLTEST.ModalDialog">
        <HostList>
            <Host Name="PHXS" Port="8920"/>
            <Host Name="IDSN" Port="8921"/>
        </HostList>
    </Extension>
</ExtensionList>
http://localhost:8900/ (opens new window)
# ExtendScript 调试
Adobe ExtendScript Toolkit CC 工具可以直接调试 ExtendScript 后台代码,在里面可以编辑 ExtendScript 并让其在指定的宿主应用中运行,而且重要的是可以通过 Data Browser 查看实时查看宿主应用的 DOM。

# 基于 vue 开发扩展插件
使用 @kuaizi/vue-cli-plugin-cep插件为 vue 项目创建模板。首先使用 vue-cli 创建项目。
> vue create demo-cep
> cd demo-cep
> vue add @kuaizi/vue-cli-plugin-cep
> yarn serve
基本插件文件夹 /public/cep, 使用软链映射到 C:\Users\tommyshao\AppData\Roaming\Adobe\CEP\extensions , 前端入口界面做链接跳转:
<!DOCTYPE html>
<html lang="zh-CN">
  <head>
    <meta charset="utf-8">
    <meta http-equiv="X-UA-Compatible" content="IE=edge">
    <meta name="viewport" content="width=device-width,initial-scale=1.0">
    <title><%= options.name %></title>
  </head>
  <body>
    <script>
      window.location.href = "http://localhost:8080";
    </script>
  </body>
</html>
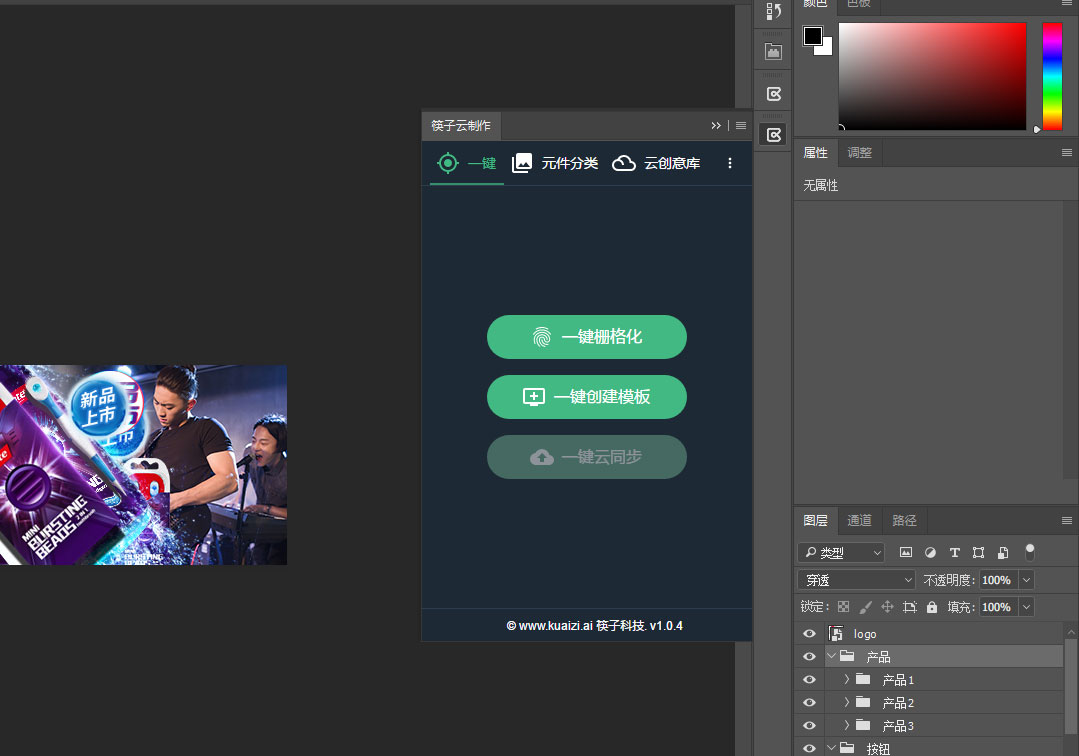
成功案例:筷子云制作
# 插件的安装包构建
使用 electron 分别打包成 windows 和 Mac的插件安装包程序。
安装程序主要的执行代码:
'use strict'

const electron = require('electron')
const fs = require('fs-extra')
const path = require('path')

// Module to control application life.
const app = electron.app
// Module to create native browser window.
const BrowserWindow = electron.BrowserWindow

// Keep a global reference of the window object, if you don't, the window will
// be closed automatically when the JavaScript object is garbage collected.
let mainWindow

const appName = '../dist/me.tomieric.www'

function createWindow () {
  // Create the browser window.
  mainWindow = new BrowserWindow({width: 550, height: 500})

  // and load the index.html of the app.
  mainWindow.loadURL('file://' + __dirname + '/index.html')

  mainWindow.webContents.on('did-finish-load', installPlugin)

  // Emitted when the window is closed.
  mainWindow.on('closed', function () {
    // Dereference the window object, usually you would store windows
    // in an array if your app supports multi windows, this is the time
    // when you should delete the corresponding element.
    mainWindow = null
  })
}

function installPlugin () {
  let baseBath
  let installPath

  if (process.platform === 'darwin') {
    // 测试不能加载插件
    // baseBath = process.env['HOME'] + '/Library/Application Support/Adobe/'
    baseBath = '/Library/Application Support/Adobe/'
  } else {
    baseBath = process.env['USERPROFILE'] + '/AppData/Roaming/Adobe/'
  }

  installPath = baseBath + 'CEP/extensions/' + appName + '/'
  movePlugin(installPath)
}

function movePlugin (installPath) {
  fs.emptyDir(installPath, function (mkdirErr) {
    // path exists unless there was an error
    console.error(mkdirErr)

    fs.copy(path.join(__dirname, appName), path.resolve(installPath), function (err) {
      let message = 'loaded'
      if (err) {
        console.error(err)
        message = err
      }
      mainWindow.webContents.send('status', message)
    })
  })
}

// This method will be called when Electron has finished
// initialization and is ready to create browser windows.
app.on('ready', createWindow)

// Quit when all windows are closed.
app.on('window-all-closed', function () {
  app.quit()
})

app.on('activate', function () {
  // On OS X it's common to re-create a window in the app when the
  // dock icon is clicked and there are no other windows open.
  if (mainWindow === null) {
    createWindow()
  }
})